
A card holder is three pieces of leather and one run of stitching. That is the whole object. It is also the project where a quarter inch of error shows the most, because the card either falls out of its pocket or refuses to go in.
Video: Punching Stitching Holes to My Briefcase Gusset, from Marcellino NY Briefcase Maker on YouTube. Shown for inspiration and technique only: it is not the item in this pattern pack.
Marcellino NY Pattern Pack No. 1
Slim Card Holder: Printable PDF Pattern
⬇ DOWNLOAD THE PATTERN PACK (PDF)5 pages · US Letter or A4, print at 100% · materials list, true-size pattern, assembly steps, print check
The pattern below is a Marcellino NY design, drawn around a standard bank card and prints at true size in the Marcellino NY Pattern Pack No. 1: Slim Card Holder, one PDF with materials, true-size pattern pages, assembly steps and a print-accuracy check. Print it at 100 percent, check the 1 inch square on the page with a ruler, and trace the three pieces onto card stock. The card stock becomes your template for as many holders as you want to cut.
What the pattern fits and which leather it needs
Bank cards, driver’s licenses and most membership cards follow the ID-1 format, which measures 3.370 by 2.125 inches (85.60 by 53.98 mm). The holder measures 3¾ by 2¾ inches. With the stitch line set 1/8 inch inside the left and right edges, the inside width is 3½ inches, which leaves about 1/8 inch of slack around a card. That is enough to slide it out with one finger and tight enough that it will not fall out when the holder is turned over.
The leather is 3 to 4 oz. Tandy’s weight chart puts 3 to 4 oz at 3/64 to 1/16 inch (1.2 to 1.6 mm) and lists wallet exteriors among its uses. One ounce of leather is about 1/64 inch, so three layers stacked at the stitched edge come to 9 to 12 oz of leather, roughly 3.6 to 4.8 mm. Go heavier and the seam turns into a brick; go lighter and the pockets have little body.
Vegetable-tanned bridle or natural vegetable-tanned leather both work. I cut from the bend, the butt section where the fiber is tightest, and I use the shoulder only for small parts like this. The belly goes in the trash.
The tools:
- A sharp knife or shears, a steel ruler and a cutting surface
- A 3 mm diamond stitching chisel, four prongs plus a two-prong for corners, and a mallet. Lee Valley’s chisel and awl sets come in 3 mm and 4 mm
- Two harness needles, waxed thread, and pliers for pulling a needle through
- Contact cement or another leather glue, sandpaper, an edge beveler and a slicker
Cutting the three layers
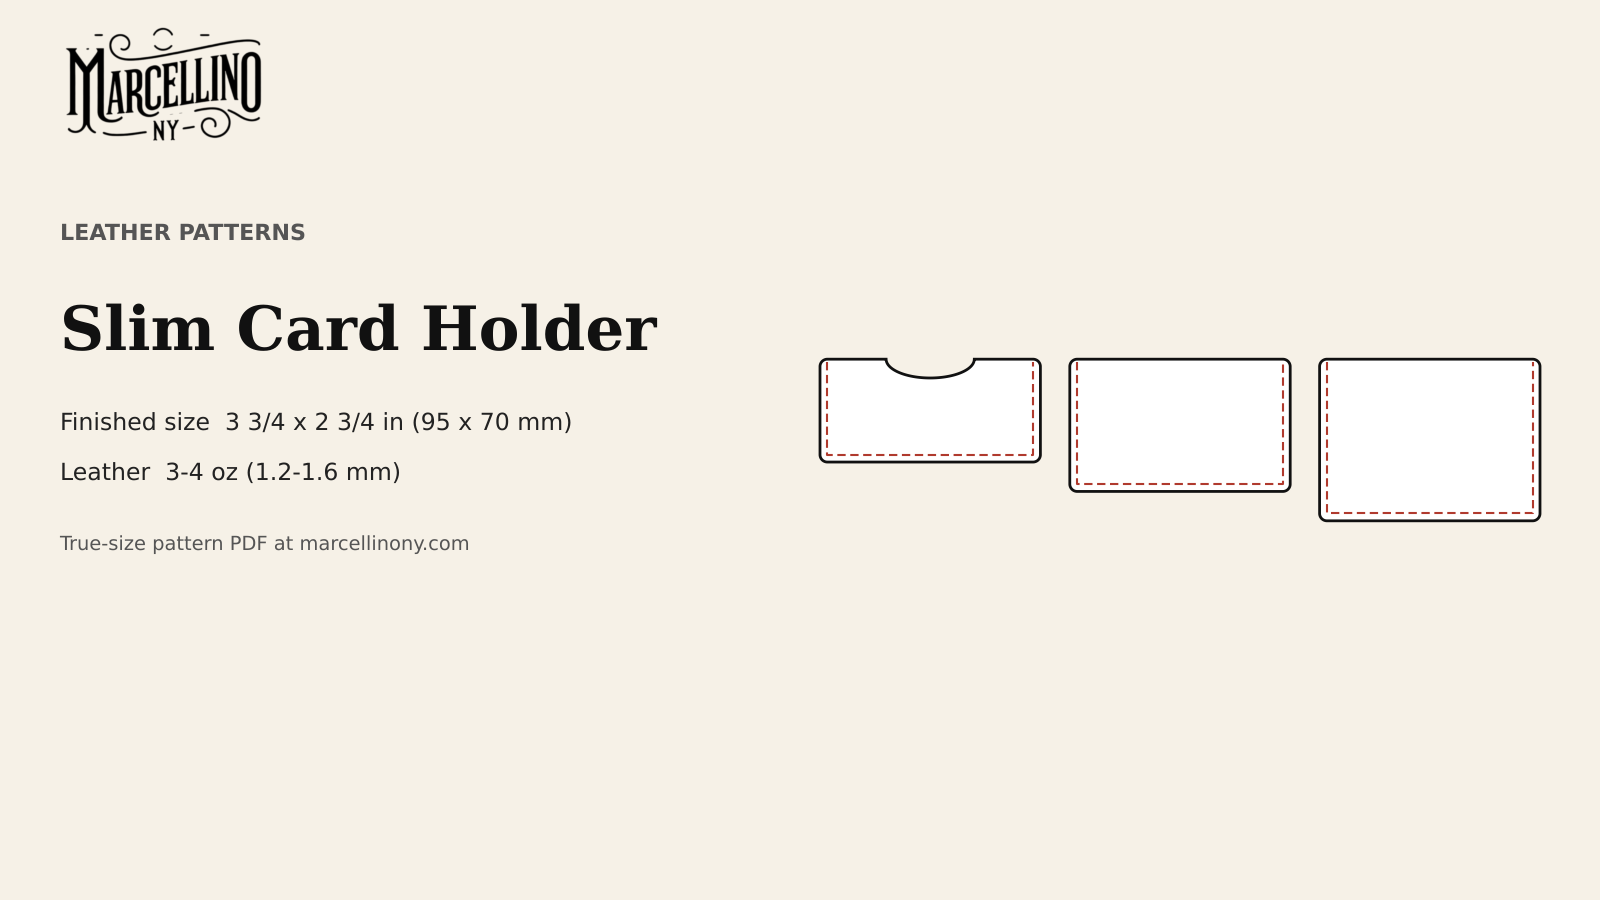
Lay the template on the smooth side of the leather and mark around it with a scratch awl. Three pieces, one of each:
- Back: 3¾ by 2¾ inches
- Middle: 3¾ by 2¼ inches
- Front: 3¾ by 1¾ inches, with a thumb notch 1½ inches wide and 5/16 inch deep in the top edge
Each layer sits ½ inch lower than the one behind it. The steps matter more than they look. They set where each pocket opens and they give the thumb a place to land.
Cut the straight runs against a steel ruler in several light passes rather than one hard one. Thick leather pushes a knife off line when the cut is rushed, and a wandering edge on a piece this small shows from across the room. The same goes for the bottom corners, which are rounded on the pattern. Mark them with a coin or a template, cut them slowly, and sand away any flat spots. Both jobs have their own posts: cutting straight lines in thick leather and rounding corners cleanly.
A thumb notch is a small half-circle or shallow curve. Punch or cut it before anything is glued, since a slip on a loose piece costs one piece instead of the whole holder.

Finishing the top edges before anything is joined
The three top edges stay open, so they have to be finished while the pieces are still separate. Once the layers are stitched together nobody can get a slicker between them.
The sequence is the one most leather shops teach: sand the edge flat, bevel both the grain side and the flesh side, apply water, wax or gum tragacanth, and rub with a burnisher until the fibers compress and the edge turns glassy. Sailrite’s walkthrough covers each step, including why bevelling both sides keeps the edge from mushrooming under the slicker. If the edge is going to be dyed, dye it first. Burnishing with gum tragacanth seals the edge, and sealed leather refuses dye.
I burnish by hand, with a wooden roller or a slicker, and I stop when the edge is smooth to the thumb and warm from friction. If the edge looks fuzzy after the first pass, I do not push harder. I sand lightly, re-wet it, and go again.
The sides and bottom do not get finished yet. They will be trimmed flush after stitching, and the edge gets its last pass then.
Punching the holes through all three layers
Dry-fit the pieces with the back flat on the bench, the middle on top of it and the front on top of that, bottom edges lined up. Glue is there to hold the layers still while you punch and sew. Brush a thin coat inside the stitching margin only, not across the pocket, press the layers together, and let the cement set according to the label. Glue inside the pocket is the one thing that ruins a holder after the leather is already cut.
Mark the stitch line 1/8 inch (3 mm) in from the left, bottom and right edges. The tops stay open and unstitched. A 3 mm diamond chisel gives about 8½ stitches per inch, and the stitch line on this pattern runs close to nine inches, which means somewhere near 75 holes.
Strike the chisel with one firm tap of the mallet. Lee Valley notes that in thick or tough hide the chisel may not go all the way through and an awl may be needed to finish the holes. Three layers of 3 to 4 oz is exactly that case. Punch every hole before you sew a single stitch, and check the back of the work to see that the holes came out the other side in line. Aligned holes are the difference between a seam that sits straight and a seam that wanders. On thick bridle I pre-punch and align every hole for the same reason.
At the two bottom corners, switch to the two-prong chisel or mark the holes with an awl so the spacing tightens around the curve. Stitching tight curves and corners in thick leather has the method.

Saddle stitching the seam
A saddle stitch uses one length of thread with a needle on each end. Each hole takes both needles, passing in opposite directions. If one stitch breaks, its neighbors hold, while a machine stitch can unravel along the seam once a single stitch gives. I gave up sewing machines on leather a long time ago, and a card holder is a good place to see why. The stitching is what the customer’s thumb touches every day.
Cut the thread to about 36 inches. Art of Manliness says to cut at least 3.5 times the seam; Weaver Leather Supply says about 4 times the length of the groove line. Nine inches times four is 36. Running out of thread mid-seam costs more than a few extra inches, so I cut to the long end. Wax the thread first so it grips, using the method in waxing thread before you stitch.
Start at the top of the left side. Pass the first needle through the first hole, center the thread, then take the second needle through the same hole from the other side. Pull both ends firm and even. Every pass after that repeats the move: left needle through, right needle through, pull. Keep the same needle on top every time and the stitches all lean the same way.
Three layers of 3 to 4 oz is far easier than the thick English bridle on a briefcase gusset, which is killer on the fingers. Pliers still earn their place. Pulling a waxed needle through three layers with bare fingers is how a blister starts.
At the end of the seam, go back through the last two holes, then trim the thread tight to the leather. The full walkthrough with photos and troubleshooting is in The Saddle Stitch Explained.
Trimming the sides and checking the fit
After stitching, the left, bottom and right edges will sit a little uneven. Sand them flush, bevel, and burnish exactly as you did the tops. The top edges you finished earlier will match if the burnish was consistent. If it was not, give them a quick refresh now.
Slide a card into each pocket. The card should go in without force, sit flat, and come out under one fingertip. If it binds:
- Check for glue creeping into the pocket. Cut it away with a knife tip.
- Check that the stitch line stayed 1/8 inch from the edge. Holes that drifted inward narrow the pocket.
- Check the print scale. A pattern printed at 95 percent produces a holder 5 percent too small, and that is the commonest reason a card will not fit.
On a briefcase I mark with a ruler and my eye. On something this small a quarter inch is the entire pocket, and the pattern earns its place. It also means the second holder takes a quarter of the time of the first.
Undyed vegetable-tanned leather darkens with sun and the oil from hands, so the holder will not look the same in a year as it does on the bench. That is the point of using this leather.

Marcellino NY Pattern Pack No. 1
Slim Card Holder: Printable PDF Pattern
⬇ DOWNLOAD THE PATTERN PACK (PDF)5 pages · US Letter or A4, print at 100% · materials list, true-size pattern, assembly steps, print check
Sources
- Greenlight, ID-1 card dimensions: https://greenlight.com/learning-center/fun-facts/credit-card-dimensions
- Tandy Leather, leather weight and thickness chart: https://tandyleather.ca/blogs/tandy-blog/leather-weight-thickness-chart
- Lee Valley, leather-stitching chisels and awl sets (stitches per inch, awl for thick hide): https://www.leevalley.com/en-ca/shop/tools/hand-tools/chisels/specialty/76712-leather-stitching-chisels-and-awl-sets
- Art of Manliness, how to sew leather (thread length): https://www.artofmanliness.com/skills/craftsmanship/how-to-sew-leather-and-other-tough-materials/
- Weaver Leather Supply, how to hand sew leather (thread length): https://www.weaverleathersupply.com/pages/how-to-hand-sew-leather
- Tanner Bates, the art of hand stitching: https://tannerbates.co.uk/blogs/news/the-art-of-hand-stitching
- Sailrite, how to finish leather edges: https://www.sailrite.com/how-to-finish-leather-edges
- Instructables, how to burnish leather edges (dye before burnishing): https://www.instructables.com/how-to-burnish-leather-edges
- Video: Marcellino NY Briefcase Maker on YouTube, https://www.youtube.com/watch?v=H0GlaiRQD2k
You might also like
- A Card Wallet With One Seam
- Diamond Chisels and French Chisels
- A Leather Key Fob in an Hour
- Thimbles and Palm Guards for Hand Stitching


