
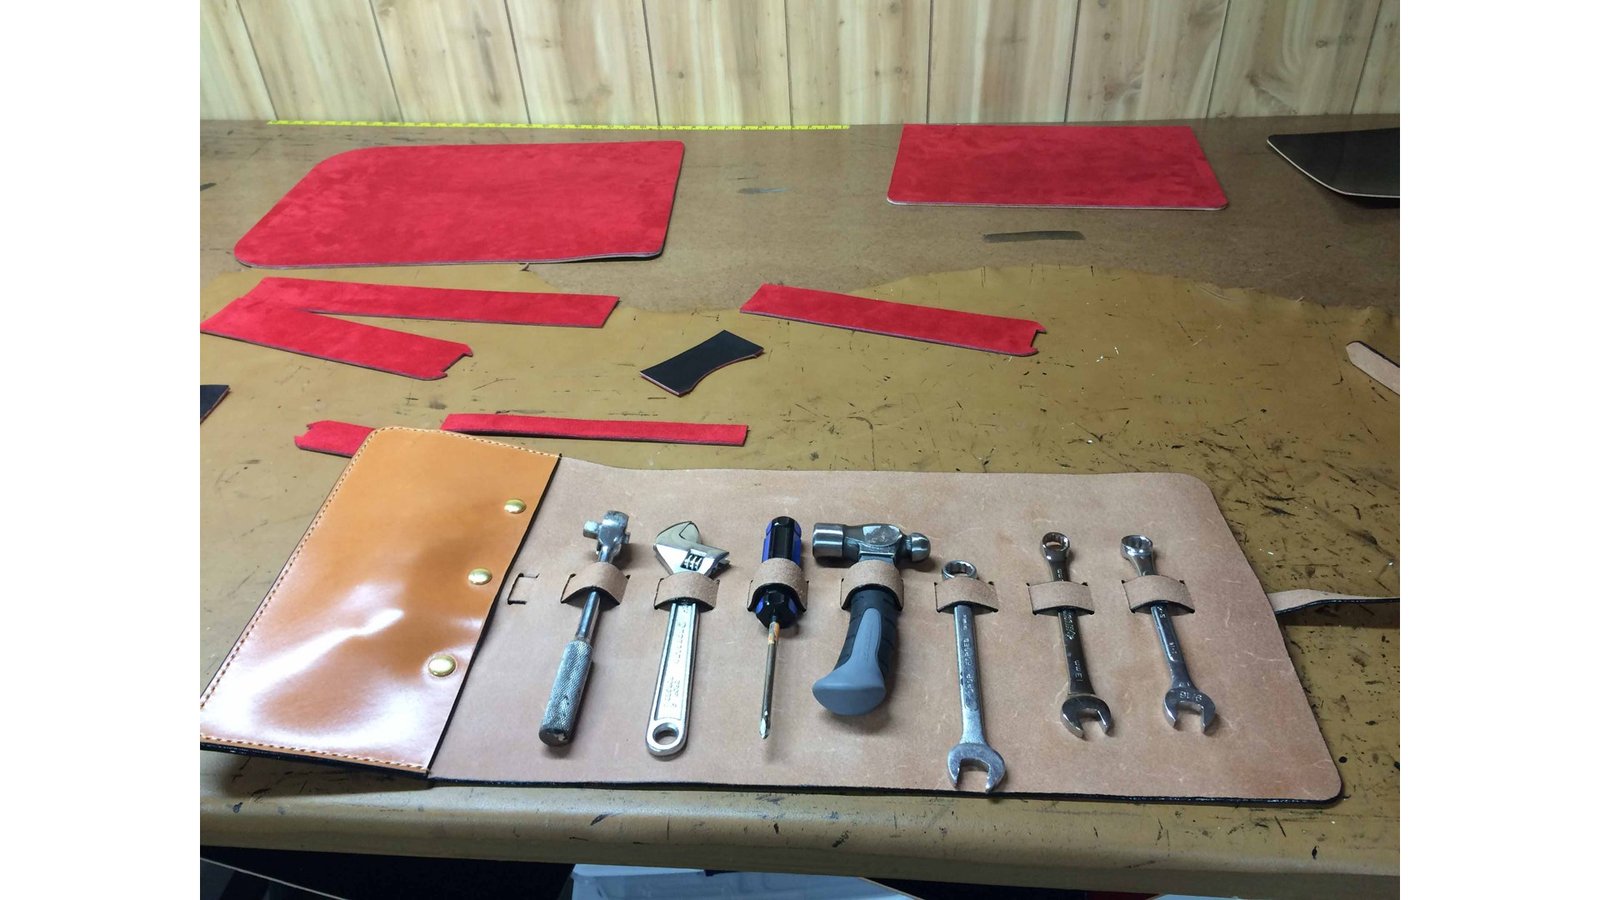
A tool roll starts with the tools, not the leather. I lay them out on the hide, shuffle them until they sit like a hand of cards, and only then pick up a knife. The photograph that sparked this post shows that moment: a ratchet, an adjustable wrench, a screwdriver, a ball-peen hammer and three combination wrenches, each standing in its own small loop on a pale natural vegetable-tanned panel.
Marcellino NY Briefcase Maker on YouTube: hand stitching versus rivets on bridle leather cases.

Behind the roll, red suede panels lie cut on the bench. A strip of yellow tape measure runs along the back edge. The workshop is not tidy, and a build photo should not be.
Why a roll, and why leather
Rolls are an old answer to a simple problem: small tools rattle, scratch each other and go missing. Modern makers still sell them in canvas. One woodworking publisher describes a cotton duck roll that opens to 12 by 16 inches with 18 pockets and two protective flaps, cinched shut with a webbing strap. A museum record at Ingenium, the Canadian science and technology collection, lists an older canvas bit roll with 16 compartments.
Canvas does the job. Leather does it for decades longer and takes the weight of a steel ratchet without sagging. A wrench head dragged across a canvas pocket frays it. Across the flesh side of natural vegetable-tanned leather, it leaves a mark that becomes part of the surface.
That is the argument for the build in the photograph: a stiff, honest leather that holds its shape when the roll is empty and when it is full.
Laying out the loops
Every decision flows from the tools themselves. The roll in the photograph holds seven, left to right: a ratchet, an adjustable wrench, a screwdriver, a hammer, then three combination wrenches. The hammer has the fattest handle and takes the widest loop. The wrenches share a narrow, matching one.
Three rules govern the layout:
- Measure the shank, not the head. The loop closes around the part of the tool that sits in it. A screwdriver blade is slim; its handle is not. The loop must pass over the handle once and then grip the shaft.
- Alternate heavy and light. A roll that puts the hammer and the ratchet side by side bulges at that end and lies crooked when rolled. Spacing the heavy tools apart keeps the finished roll even.
- Leave a margin at both ends. The flap on the left of the photograph needs clear leather to fold over; the right edge needs room to wrap.
The loops themselves are small bands of the same natural leather, set into the panel through slots and held at their ends. In the photograph each is a short, wide tab. They are cut narrower than the tool is long, so the tool stands upright and the loop sits at its balance point.


The flap
The left third of the roll is a different material. It is a tan bridle-leather flap with cream stitching around its perimeter and three brass heads running down the middle of it.
A flap does two jobs. Folded over, it covers the working ends of the tools so nothing slides out when the roll is carried. Closed, it also presents the face of the piece. Bridle leather suits that second job. It is vegetable-tanned, stuffed with waxes and oils at the tannery, and finished smooth, which is why it is the leather of saddlery and cases. The natural panel carries the load; the bridle flap carries the look.
The contrast between the two is deliberate. One leather is left raw and pale to darken with use. The other arrives already rich in color. Together they say what the object is: a working tool that is also a piece of craft.
Snaps or stitching
The brass heads on the flap are snaps or rivets, set in a vertical row of three. They hold the flap’s layers together or anchor the closing strap, depending on how the finished roll is assembled.
On cases, I trust stitching more than metal at stress points. I have said so on video: hand stitching on bridle leather cases is probably stronger than rivets, and looks better. A rivet makes one hole that takes all the load. A line of stitches shares it across dozens of small holes.
A tool roll changes the question. Most of its load is borne by the loops and the spine, not by the flap, and the flap’s hardware is closer to a closure than to a structural joint. Brass is reasonable there. It will not rust, and it will pick up the same warm color as the leather around it.
Where I want strength, I stitch. Where I want a clean clasp that a gloved hand can work, I set metal.
Cutting and finishing
The panels in the photograph are cut square and trued before anything else. The corner of the flap is rounded; the rest of the roll is rectangular. Rounded corners snag less on a bench or in a bag, and they are kinder to the stitching that has to turn them.
Edges come next. On a piece like this, the stitching line is marked first, the holes are punched, and the edges are sanded and burnished after assembly or before, depending on how many layers meet. The principle is the one set out in the earlier post on sanding edges before you burnish: the edge can only be as good as the surface it started from.
The suede panels would be glued and fitted last, where they will never be handled. A related post on lining a case in suede or bridle covers that decision.
Small bench, big lessons
The photograph earns its place because it shows an honest stage. The tools are real, a little worn, borrowed from the bench. The panels are cut and waiting. Nothing is staged.
Anyone building their own roll can take three things from it. Start from the tools. Make the loops fit the shank. Give the flap a job beyond looking good.
The workshop setup that makes this kind of build repeatable is covered in setting up a small leather workshop.
Sources
- Lost Art Press, Joiner Tool Roll: https://lostartpress.com/products/lost-art-press-tool-roll
- Ingenium, Canada Science and Technology Museums, Roll, tool (bit roll, 16 compartments): https://collection.ingeniumcanada.org/item/2004.1475.001
- Marcellino NY Briefcase Maker, Hand Stitching vs Rivets for English Bridle Leather Briefcases (YouTube): https://www.youtube.com/watch?v=EnuUpxMN8QQ
- Marcellino NY, Sanding Edges Before You Burnish: https://marcellinony.com/sanding-edges-before-you-burnish/
- Marcellino NY, Lining a Case: Suede or Bridle: https://marcellinony.com/lining-a-case-suede-or-bridle/
- Marcellino NY, Setting Up a Small Leather Workshop: https://marcellinony.com/setting-up-a-small-leather-workshop/


