
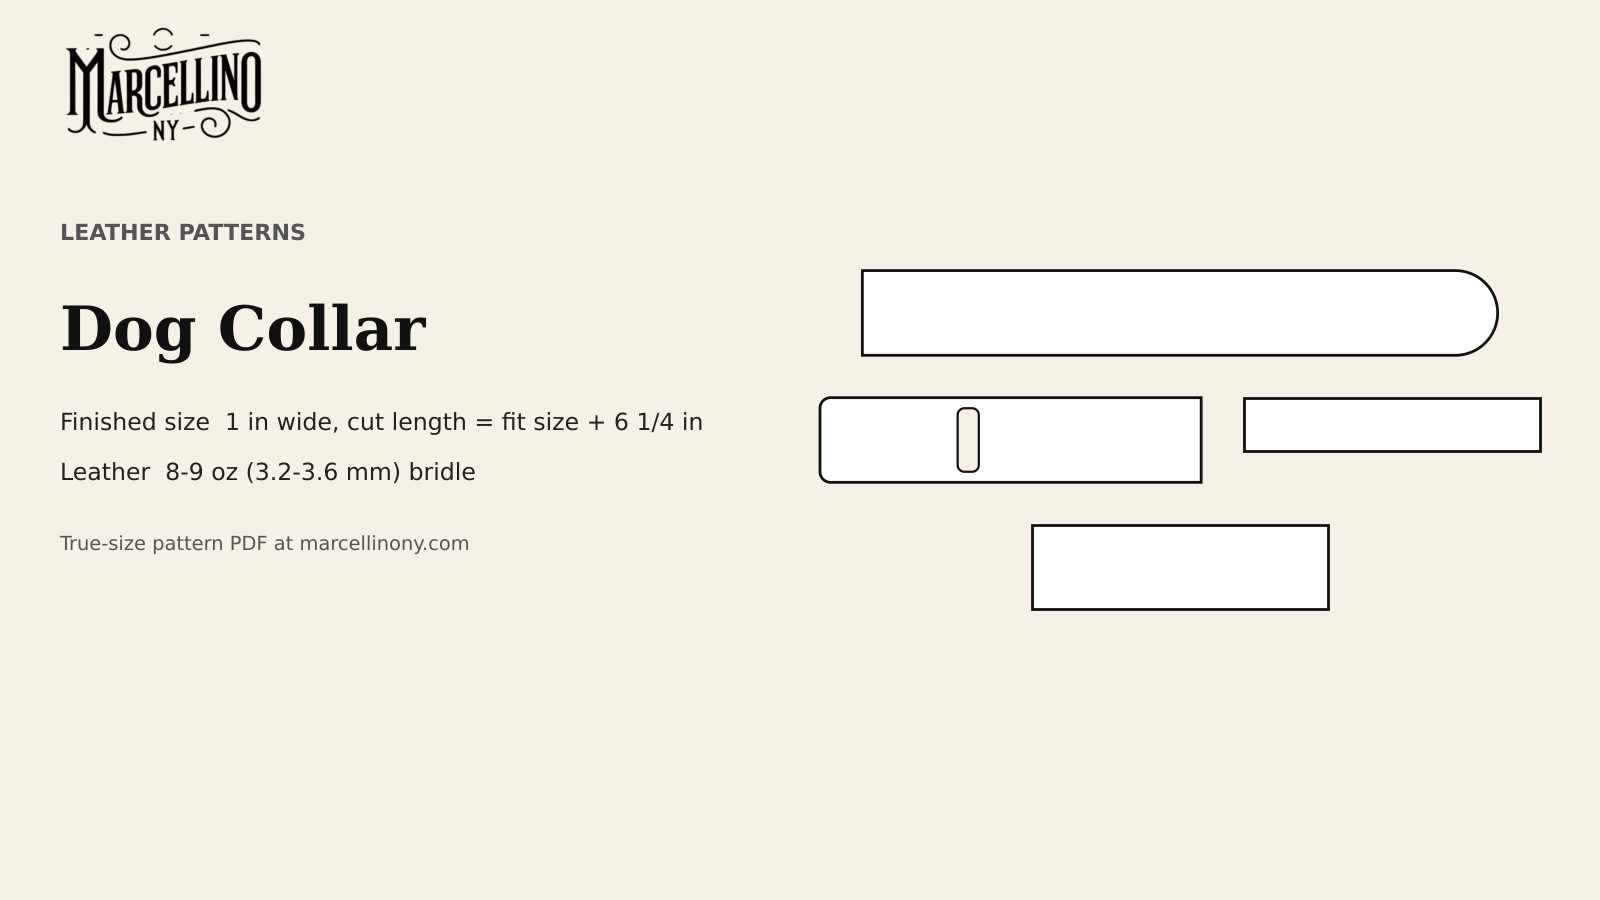
A dog collar is a belt with a ring on it. The strap, the buckle, the holes and the rivets are all belt work, and the part that is different is what hangs from the ring: a leash that can pull with the weight of a dog behind it.
Video: London Tan English Bridle Spiked Aggressive Leather Dog Collar hand stitched, from Marcellino NY Briefcase Maker on YouTube. Shown for inspiration and technique only: it is not the item in this pattern pack.
Marcellino NY Pattern Pack No. 10
Dog Collar: Printable PDF Pattern
⬇ DOWNLOAD THE PATTERN PACK (PDF)6 pages · US Letter or A4, print at 100% · materials list, true-size pattern, assembly steps, print check
The pattern prints at true size in the Marcellino NY Pattern Pack No. 10: Dog Collar, one PDF with a materials list, true-size templates for the tip, buckle end, D-ring tab and keeper, a sizing chart, step-by-step instructions and a print-accuracy check. The video above shows a hand-stitched spiked collar in English bridle leather. It is inspiration only. The collar in this pattern is a plain riveted collar with no spikes, and the build does not match the video.
For a spiked collar and the leash that goes with it, see Spiked Bridle Leather Dog Collar and A Bridle Leather Dog Leash Built to Be Handled on this site.
Measuring the dog
The American Kennel Club says the neck girth is the only measurement a collar needs. Wrap a tape around the base of the neck where the collar will sit, close but not tight, and leave room for two fingers between the tape and the neck. The same two-finger room should remain once the collar is on. If a dog falls between sizes, the AKC advice is to take the larger one.
String or ribbon works when no tape is on hand. Mark where it overlaps and lay it against a ruler.
The pattern calls the result of this measurement the fit size: the neck plus the two-finger allowance. The collar is built so the middle hole sits at that fit size, which leaves two holes tighter and two looser.
Cut length
The cut length is the fit size plus 6¼ inches. A 16 inch fit size needs a 22¼ inch strap.
Other sources add more. Tandy’s dog collar project and Make: magazine’s collar both say to take the neck measurement and add about 10 inches, then trim, since length can be taken off but not put back. Their allowance covers a longer tail and the fold at the buckle, and neither source breaks the figure down. The 6¼ inches in this pattern comes from the template geometry: the hole positions, the buckle fold and a short tail. It is a Marcellino NY figure and shorter than the published ones, so verify it on a paper strip before cutting leather. Cutting long and trimming is the safer habit with any of the three formulas.
| Fit size | 10 in | 12 in | 14 in | 16 in | 18 in | 20 in |
|---|---|---|---|---|---|---|
| Cut length (fit + 6¼ in) | 16¼ in | 18¼ in | 20¼ in | 22¼ in | 24¼ in | 26¼ in |

Holes, slot and lap
The pattern punches five holes in the tip end, at 2½, 3½, 4½, 5½ and 6½ inches from the tip. They are an inch apart. One maker on a leatherworker.net thread about dog collars spaces his holes about an inch apart for the same reason: room to adjust as the dog changes. The same poster measures the neck where the collar rides, with the tape snug and not tight.
The buckle end carries a ¼ by ¾ inch slot for the tongue, and the strap laps back on itself for 1¾ inches. Tandy and Make both thin the leather at the buckle end, about half its thickness, so the doubled section does not become a lump. The pattern asks for the same: skive the lap and leave the rest alone. Cutting Slots for Straps and Buckles covers the slot.
Leather, width and hardware
The pattern uses a 1 inch strap in 8 to 9 oz vegetable-tanned or bridle leather. At 1 oz to 1/64 inch, that is roughly 3.2 to 3.6 mm. The weight is a Marcellino NY choice. Tandy’s project does not state a weight, and Make recommends latigo with no weight stated either.
One inch is a common width and matches Tandy’s example collar. A heavier dog takes a wider strap, which spreads the pull across more of the neck. A buckle must match the strap: on the leatherworker.net thread, a maker whose buckle was sized for a 1 inch strap needed to check the fit before using it on a 1¼ inch one.
The hardware list is short. A buckle, a D-ring, four rivets and a keeper. Make’s collar uses four rivets, two before the D-ring and two after, and the pattern follows the same count. The D-ring should be a cast or welded ring. A ring with an open gap can spread under load, and a dog that pulls tests it.

Making it
Print the PDF at 100 percent and check the scale square. Cut the strap to the length in the chart. A strap cutter keeps a 1 inch width true along the whole length; a knife and a steel ruler do the same more slowly.
Mark the tip, the five holes, the slot and the lap. Punch the holes over scrap leather so the punch does not bruise the edges. Cut the slot, bevel all the edges and sand them. Sanding Edges Before You Burnish sets out the order. Dye and burnish before assembly, since the edges are hard to reach once the hardware is on.
Thread the strap through the buckle and fold it back for the lap. Set the two rivets nearest the buckle first. Slide the D-ring tab on, then set the remaining two. Make advises testing each rivet by tugging the leather and resetting any that feel loose, which is the right test on a collar. Setting Rivets and Chicago Screws Cleanly covers the technique.
The keeper is a short loop that holds the tail flat. Slide it on before the tail goes through the buckle, since a closed loop cannot pass over a buckle afterwards. On the leatherworker.net thread, one maker places a keeper about an inch from the D-ring and another a couple of inches beyond the buckle.
Make finishes its collar with water-based edge dye and works mink oil and a cream conditioner into the leather, then wipes on beeswax so the collar resists water. A collar lives outdoors, so some water resistance is worth the extra step. Tandy buffs with a soft cloth and finishes with conditioner.
Dye and condition before the hardware goes on, then burnish the edges. Test any finish on a scrap, since oils darken vegetable-tanned leather unevenly.
Riveted or stitched
The collar in this pattern is riveted. The tail, the D-ring tab and the keeper are held with rivets, and no seam runs the length of the strap. Tandy’s project and Make’s collar are both riveted too, and Make sets four rivets around the D-ring.
Stitching is the other route. The maker on the leatherworker.net thread hand-stitches all the way around a doubled collar, and the spiked collar in the video above is hand-stitched. A stitched collar looks finer and takes longer. It also asks for a stitching chisel, waxed thread and the time to do it properly; Saddle Stitch: Hand Sewing Leather covers the method.
For a first collar, the riveted version has fewer things that can go wrong. Make estimates two to three hours for its riveted collar, which is a fair figure for the first one.

Checking the fit
Fasten the collar on the middle hole and slide two fingers under it, as the AKC advises. The collar should not slip over the head and should not leave the neck pinched. If it is too loose on the middle hole, the next hole in the row tightens it by an inch.
The collar bears the pull of the leash through the D-ring and the rivets around it. Tug it hard against a fixed post before it goes on a dog, and look at the leather around each rivet. Any rivet that moves has to be reset. Check the stitching or rivets again after the first week of wear, because leather beds in and a hole that was snug can loosen. Recheck the fit after a growth spurt in a young dog, and after a haircut or a change of season in a heavy-coated one, since either changes the neck the collar has to fit.
No part of this pattern was test-cut in leather before publication. The cut length, the hole spacing and the 8 to 9 oz weight are Marcellino NY design choices checked against published collar projects, so cut a paper strip and a scrap of leather first and wrap them around a measuring tape set to the fit size. A collar is a safety item. A finished collar should be loaded and inspected before it goes on a dog, and checked again as the leather wears, because the first failure of a worn rivet or a thinned lap is usually visible well before it lets go.
Marcellino NY Pattern Pack No. 10
Dog Collar: Printable PDF Pattern
⬇ DOWNLOAD THE PATTERN PACK (PDF)6 pages · US Letter or A4, print at 100% · materials list, true-size pattern, assembly steps, print check
Sources
- American Kennel Club, how to measure your dog for gear: https://www.akc.org/expert-advice/lifestyle/measure-dog-gear/
- Tandy Leather, dog collar project: https://tandyleather.eu/blogs/project-ideas/dog-collar
- Make: magazine, DIY dog collar: https://makezine.com/projects/diy-dog-collar
- Leatherworker.net, needing help on a dog collar: https://leatherworker.net/forum/topic/19254-needing-help-on-a-dog-collar
- Video: Marcellino NY Briefcase Maker on YouTube, https://www.youtube.com/watch?v=GMneqrbPtC8
You might also like
- A Spiked Collar With No Leash Ring
- A Bridle Leather Dog Leash Built to Be Handled
- Cutting Slots for Straps and Buckles
- Setting Rivets and Chicago Screws Cleanly


