
A pocket notebook cover has two jobs. It keeps a 48-page paper book from curling in a back pocket, and it gives the pen somewhere to live. Everything else is decoration.
Video: Hand Stitched Bridle Leather Writing Pad Portfolio, from Marcellino NY Briefcase Maker on YouTube. Shown for inspiration and technique only: it is not the item in this pattern pack.
Marcellino NY Pattern Pack No. 5
Pocket Notebook Cover: Printable PDF Pattern
⬇ DOWNLOAD THE PATTERN PACK (PDF)7 pages · US Letter or A4, print at 100% · materials list, true-size pattern, assembly steps, print check
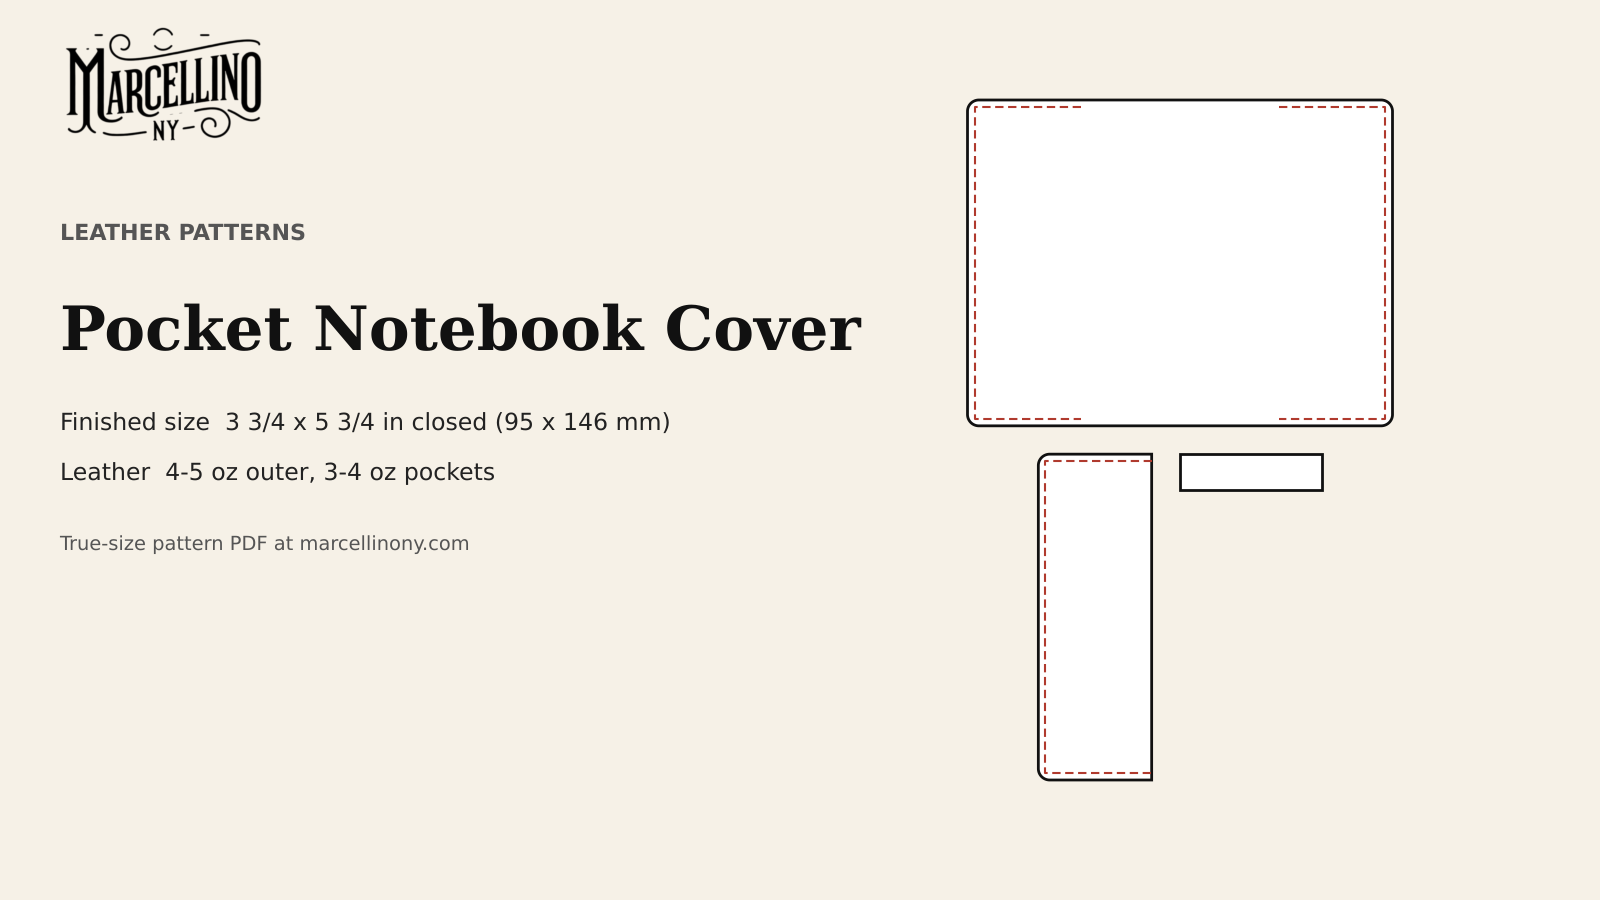
The pattern is a Marcellino NY design that prints at true size in the Marcellino NY Pattern Pack No. 5: Pocket Notebook Cover, one PDF with materials, true-size pattern pages, assembly steps and a print-accuracy check.The pack holds the outer, the pocket and the pen loop. It is cut for the 3.5 by 5.5 inch pocket notebook. JetPens’ guide to Field Notes describes those memo books as 3.5 by 5.5 inches, half an inch taller and wider than a standard index card, and says they are made to fit a pants or jacket pocket. Other brands sell books in the same size. For a book of another size, a tailored cover starts with a measurement, not a pattern.
For a plainer cover with no pen loop, there is also A Leather Journal Cover on this site. This version adds a loop for the pen and a more exact fit.
The pieces and the leather
Three parts make the cover:
- Outer: 7½ by 5¾ inches open, 4 to 5 oz
- Pocket: 2 inches wide and 5¾ inches tall, cut two, one mirrored, 3 to 4 oz
- Pen loop: 2½ by 5/8 inch, 3 to 4 oz
Tandy’s weight chart lists 3 to 4 oz at 3/64 to 1/16 inch (1.2 to 1.6 mm) for wallet exteriors. It has no row for 4 to 5 oz, but its basic rule is that one ounce is about 1/64 inch, so 4 to 5 oz works out to 1/16 to 5/64 inch, or 1.6 to 2.0 mm. That is a firm outer that holds its shape and a lighter pocket that folds over the cover of the notebook without making a ridge.
Vegetable-tanned bridle suits this. I cut from the bend, the dense butt section of the hide, and keep the belly out of anything that has to hold a shape. The finished cover measures 3¾ by 5¾ inches closed.
Tools: a sharp knife and steel ruler, a 3 mm diamond stitching chisel and mallet, an edge beveler, a slicker or wood roller, two harness needles, waxed thread, and contact cement. Lee Valley lists the 3 mm chisel at about 8½ stitches per inch.
Fit before cutting
Spine allowance on the pattern is ¼ inch. That figure is a starting value. A notebook with more pages, or one loaded with sticky notes, is thicker, and a cover cut for a thin book will bow.
Measure your actual book. Lay a ruler across the closed notebook and read its width, height and thickness. Compare the width and height to 3.5 by 5.5 inches. If the thickness is more than a quarter inch, add the difference to the spine allowance before cutting the outer.
Cut the outer last, once you are happy with the measurement. If the book is the standard size, cut from the pattern as drawn.
A paper mock-up saves leather. Trace the outer and one pocket onto card stock, cut them out, tape the pocket down on the inside face and slide the real notebook in. Fold the card closed and look at the spine. If it bows or the book will not seat, change the template now. The pen loop can be tested the same way with a strip of card taped to the front panel and the pen pushed through it.

Cutting the outer, the pockets and the loop
Mark the outer on the smooth side of the leather with the template and a scratch awl. Cut the straight sides against a steel ruler in several light passes. Thick leather pulls a knife off the line when the cut is rushed, which is why cutting straight lines in thick leather is worth reading if long straight cuts are new to you. Round the corners as drawn.
Cut the two pockets. One is the mirror of the other, so flip the template for the second and mark the flesh sides L and R. Cut the pen loop, a strip 2½ by 5/8 inch.
Hold the pieces against the notebook at this point as a dry test. The pockets should reach about two inches over each cover of the book. The loop is small enough to lose, so keep it somewhere flat.
Finishing the pocket edges and the loop
The open edges, where the book slides into the pockets, get handled every time the notebook comes out. Sand, bevel and burnish them while the pieces are flat.
Tandy’s guide to leather edges lists hand burnishing with a wooden or plastic slicker after applying water, gum tragacanth or a similar gum. Sailrite’s version explains why both sides get bevelled: it keeps the edge from mushrooming under the slicker. If the edge gets dye, apply it first; burnishing with gum tragacanth seals the edge and sealed leather turns dye away. Burnishing Tools Compared covers the tool choice.
The loop is only 5/8 inch wide, so do both long edges with a slicker in one pass each.

The pen loop goes on first
The loop is stitched to the front panel before the pocket is attached, and the order is not optional. The pocket covers the area where the tabs sit, so the loop has to be on the outer already.
On the pattern, the loop has a ½ inch tab at each end, which leaves 1½ inches of free span between them. Stitch each tab to the edge of the front panel, about 1¾ inches down from the top. The finished loop stands about 1¼ inches proud of the cover and fits a pen about ½ inch across. Measure your own pen. If it is wider, trim the loop to fit by lengthening the free span.
Mark the tab positions with an awl. Punch the holes with the 3 mm chisel and stitch a short row across each tab, then lock the thread by going back through the last holes. The row is small, which is why the stitch needs to be tight and the knot invisible. I pre-punch and align every hole for the same reason on bags: a loop stitched crooked is a loop that looks wrong every time the notebook comes out.
Gluing and stitching the pockets
With the loop on, lay the outer flat. Dry-fit the pockets on the inside faces, one at each end, with their outside edges lined up with the left and right edges of the outer. The edge that faces the spine stays open.
Glue a thin line in the stitching margin only. Mark the stitch line 1/8 inch in from the edge on three sides of each pocket: top, bottom and outside edge. That is 9¼ inches per pocket, around 80 stitches at 3 mm spacing.
Punch the holes through the pocket and the outer together. Where the chisel will not go all the way through, finish with an awl, as Lee Valley advises for thick hide. Check that the holes came out the far side of the outer in a straight line.
Saddle stitch each pocket. Art of Manliness recommends at least 3.5 times the seam length for thread and Weaver Leather Supply says about 4 times. For 9¼ inches that is 32 to 37 inches. Wax the thread first, as described in waxing thread before you stitch, and pull the needles with pliers if the leather grips them.
Start at the open edge on the top, run around the corner and down the outside edge, around the bottom corner and back to the open edge. Lock the ends and trim.

Checking the fit
The video at the top shows a hand-stitched bridle leather writing pad portfolio, a bigger relative of this project. Watching the stitching on a larger piece makes the small one easier to plan.
Slide the notebook into the pockets and close the cover, then carry it in a back pocket for a day. A cover that bends and springs back is doing its job, and one that stays bowed needs a wider spine allowance on the next pattern. It should sit square, with the spine allowance showing as a slight round at the fold, not a hard ridge. Put a pen through the loop and open and close the cover a few times. Check that:
- The pen clears the loop without a fight.
- The pocket edges do not catch the notebook’s cover.
- The cover closes without bowing.
If the cover bows, the spine allowance is too small for the book. If the book rattles in the pockets, they are too shallow, and the next cover wants a wider pocket zone.
The honest limit of this pattern: it is built for a thin book, and it only fits books near 3.5 by 5.5 inches. A cover is a fitted garment, not a universal sleeve. Measure the book each cover is for, and treat the pattern as the place to start.
Marcellino NY Pattern Pack No. 5
Pocket Notebook Cover: Printable PDF Pattern
⬇ DOWNLOAD THE PATTERN PACK (PDF)7 pages · US Letter or A4, print at 100% · materials list, true-size pattern, assembly steps, print check
Sources
- JetPens, Field Notes guide (3.5 by 5.5 inch memo books): https://www.jetpens.com/blog/field-notes-a-comprehensive-guide/pt/417
- Tandy Leather, leather weight and thickness chart: https://tandyleather.ca/blogs/tandy-blog/leather-weight-thickness-chart
- Tandy Leather, mastering leather edges: https://tandyleather.ca/blogs/tandy-blog/mastering-leather-edges
- Lee Valley, leather-stitching chisels and awl sets: https://www.leevalley.com/en-ca/shop/tools/hand-tools/chisels/specialty/76712-leather-stitching-chisels-and-awl-sets
- Sailrite, how to finish leather edges: https://www.sailrite.com/how-to-finish-leather-edges
- Instructables, how to burnish leather edges: https://www.instructables.com/how-to-burnish-leather-edges
- Art of Manliness, how to sew leather: https://www.artofmanliness.com/skills/craftsmanship/how-to-sew-leather-and-other-tough-materials/
- Weaver Leather Supply, how to hand sew leather: https://www.weaverleathersupply.com/pages/how-to-hand-sew-leather
- Video: Marcellino NY Briefcase Maker on YouTube, https://www.youtube.com/watch?v=mWNFVqeAKnQ
You might also like
- A Leather Journal Cover
- A Leather Pen Sleeve
- A Leather Bookmark
- Gluing Leather: When Contact Cement Helps and When to Skip It


