
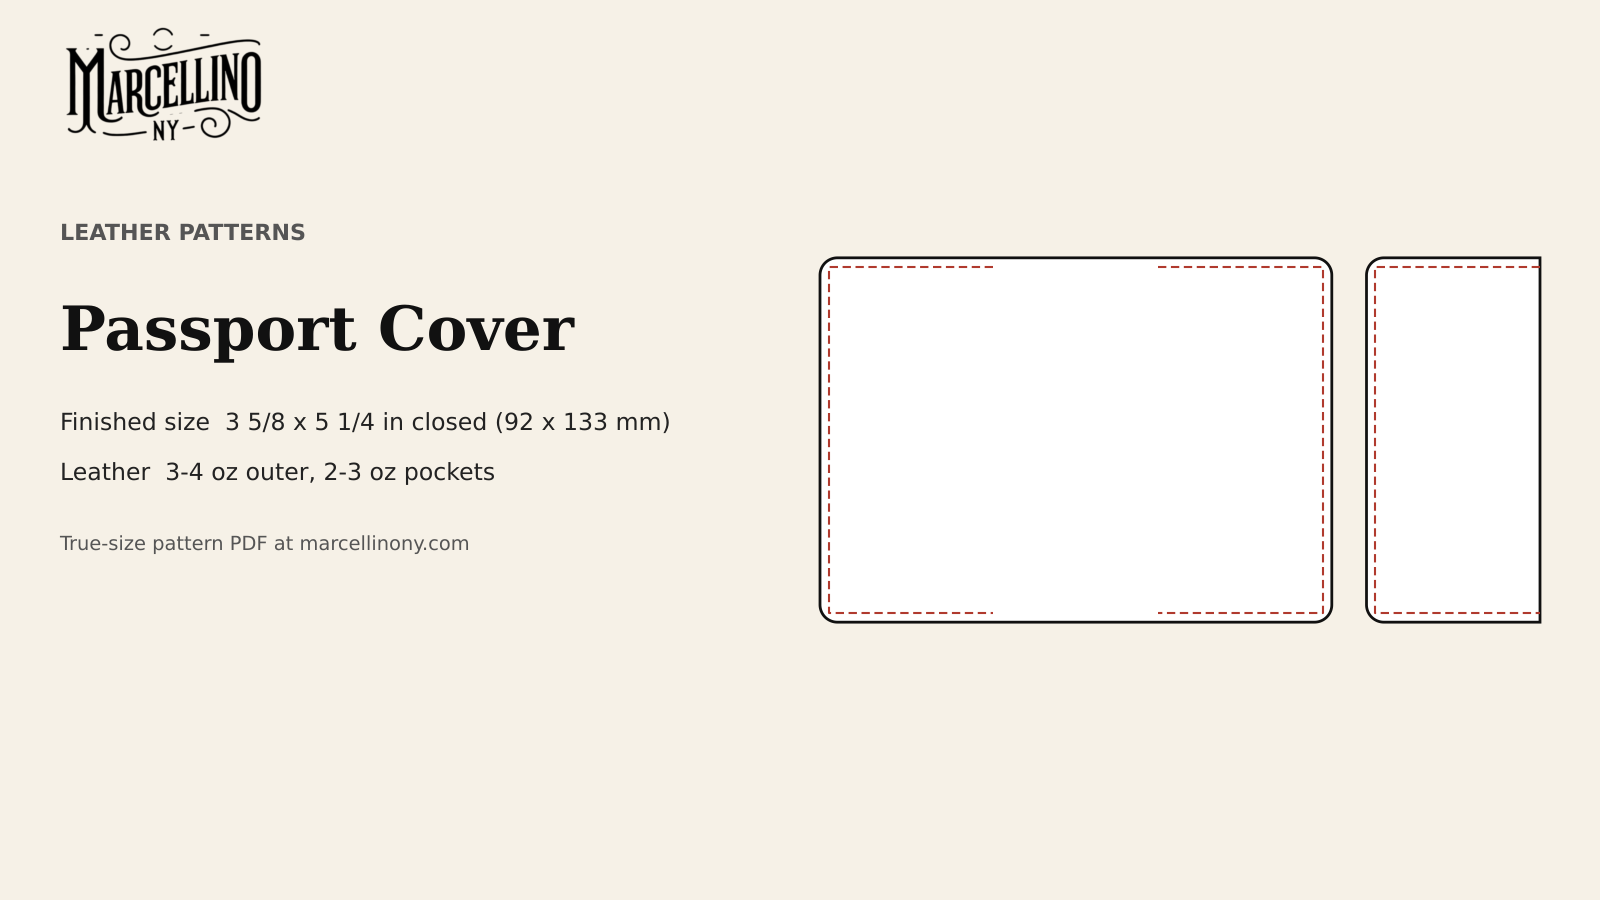
The hard part of a passport cover is not the leather. It is the book. Passports are not one size everywhere, and a pattern cut to one figure can be a quarter inch off another.
Video: “Stitching the edge of a Panel to my Latest Leather Case”, from Marcellino NY Briefcase Maker on YouTube. Shown for inspiration and technique only: it is not the item in this pattern pack.
Marcellino NY Pattern Pack No. 4
Passport Cover: Printable PDF Pattern
⬇ DOWNLOAD THE PATTERN PACK (PDF)6 pages · US Letter or A4, print at 100% · materials list, true-size pattern, assembly steps, print check
This pattern is a Marcellino NY design that prints at true size in the Marcellino NY Pattern Pack No. 4: Passport Cover, one PDF with materials, true-size pattern pages, assembly steps and a print-accuracy check. It is one outer piece and two pockets, stitched on three sides each, and it is cut for a book measuring 4.92 by 3.46 inches (125 by 88 mm). The rest of this post covers why that figure, how the cover goes together, and where the fit can go wrong.
Which passport size the pattern fits
Two numbers are in circulation for the US passport book. The State Department’s comparison sheet lists the passport book at 5 by 3½ inches. The international standard behind it, the ID-3 format, is 125 by 88 mm, which converts to 4.921 by 3.465 inches. Wikipedia’s table of the ISO/IEC 7810 card sizes lists ID-3 as the passport booklet format. It is used here because nothing better turned up for that figure, and a primary copy of the standard sits behind a paywall.
The two numbers describe the same book rounded differently. The pattern uses the metric one and adds room around it. The outer piece measures 7⅜ by 5¼ inches open. Each half of the cover is 3⅝ inches wide when closed, which is 3.46 inches plus about 1/6 inch, and 5¼ inches tall against a 4.92 inch book.
One more reason to measure your own book before cutting leather. In April 2026 the State Department published a Federal Register notice saying the US will move to a single standard passport book size, with a 38-page book, ending the choice of book sizes. The notice was summarized by an immigration law firm; I did not read the Federal Register text itself. If your passport is a new one, hold it against the pattern before you cut.
Leather and tools
The outer is 3 to 4 oz vegetable-tanned leather, and the pockets are 2 to 3 oz. Tandy’s weight chart puts 3 to 4 oz at 3/64 to 1/16 inch (1.2 to 1.6 mm) and lists wallet exteriors among its uses, and 2 to 3 oz at 1/32 to 3/64 inch (0.8 to 1.2 mm), for wallet interiors. That is the same split here: a firm outer and thin pockets that do not bulk up the fold.
Tools: knife or shears and a steel ruler, a 3 mm diamond stitching chisel and mallet, an edge beveler, a slicker, two harness needles, waxed thread, contact cement. The 3 mm chisel gives about 8½ stitches per inch according to Lee Valley.
Before any leather is cut, trace the outer and the pockets onto card stock, cut them out, and fold the card around the real passport. Tape the pockets down on the inside faces, slide the book in, and close the cover. The card cover costs nothing and tells you in a minute whether the pockets reach far enough over the book and whether the center strip lets the cover close flat. A mistake caught in card stock is a recycled piece of card. A mistake caught in 3 to 4 oz bridle is a cut you do again.
Mark on the card anything you change, then carry that change to the leather. If the mock-up shows the cover needs another eighth of an inch, the fix belongs on the template, not on the leather.

Cutting the outer and the two pockets
The outer is a single rectangle, 7⅜ by 5¼ inches, with the corners rounded as drawn. The pockets are 2½ inches wide and 5¼ inches tall, the full height of the cover. Cut two. One is mirrored from the other, so mark them with the grain side up and flip the template for the second.
A mirrored pair is the place where a small mistake costs a piece of leather. Mark them in pencil on the flesh side before you cut. Write L and R on the back of each so they do not get mixed up in the pile.
Cut the long straight sides against a ruler in light passes. The post on making a pattern from cardboard covers how to turn the printed sheet into a template that lasts, and Rounding Corners Cleanly handles the corners.
Finishing the edges before you stitch
The pocket edges that face the inside of the cover will rub against the passport each time it goes in and out. Finish them first. The inner edges of the pockets, where the book slides in, are the ones to bevel, sand and burnish while the pieces are still flat. After stitching they are reachable, but only with difficulty.
The sequence is the one Sailrite describes: sand the edge flat, bevel the grain and flesh sides, wet it with water or gum tragacanth, and burnish by rubbing with a slicker or wood roller until it turns glassy. Sanding Edges Before You Burnish covers the sanding step, which decides how good the finish looks. Dye, if any, goes on before burnishing, because gum tragacanth seals the leather and a sealed edge won’t take color.

Gluing and punching
The pockets sit on the inside face of the outer piece, one at each end, with their outside edges lined up with the left and right edges of the outer. On the pattern the pocket zone is 2½ inches wide at each end, which leaves a bare strip of leather, about 2⅜ inches wide, between the two pockets. That strip is the spine. Each pocket is stitched on three sides, along the top, the bottom and the outside edge. The edge that faces the spine stays open, and the cover of the passport slides in through it.
Dry-fit first. Mark the position of each pocket on the outer in pencil. Glue a thin line in the stitching margin only, never across the pocket opening, and set the pocket in place.
Mark the stitch line 1/8 inch (3 mm) in from the edge. Punch through the pocket and the outer together with the 3 mm chisel, and finish any hole that doesn’t go through with an awl. The double layer makes it tempting to cheat a chisel at a corner. Don’t. A stitch line that drifts looks worse than any other flaw on a cover this plain. If the hole spacing gets crowded at a corner, mark the holes by eye with an awl, as covered in Stitching Tight Curves and Corners in Thick Leather.
Stitching the pockets
The video above shows the edge of a panel being stitched on a briefcase, which is the same motion at larger scale: one needle through, the second needle through the same hole from the other side, pull both firm.
Saddle stitch each pocket separately. The stitch line on the pattern runs 9¾ inches per pocket, which comes to roughly 80 stitches at the 3 mm pitch. Art of Manliness says to cut thread at least 3.5 times the seam, and Weaver Leather Supply says about 4 times. For 9¾ inches that is 34 to 39 inches. Cut toward the long end. If the thread runs out partway, start a new length a few holes back, as described in The Saddle Stitch Explained.
Start at the open edge on the top, stitch around the corner, down the outside edge, around the bottom corner and back to the open edge. At each end, lock the thread by going back through the last two holes, then cut it close.
I sew every one of these by hand, and I will say plainly that a glued pocket would be faster. Glue alone fails the first time somebody pulls the passport out by the corner with the cover in the other hand. The thread is what keeps the pocket on. Glue only holds the layers still while the needles go through, and I use as little of it as I can.

Finishing the edges and fitting the book
After stitching, the top, bottom and outside edges of each pocket sit slightly uneven against the outer. Sand them flush, bevel both sides, wet them with water or gum tragacanth, and burnish as you did the pocket edges. Then do the rest of the outer’s perimeter, which has not been touched yet.
Leave the center strip between the pockets alone apart from the edge treatment. It is the one part of the cover that bends every time the passport is opened and closed. Leather without stitches or glue bends better than leather with either.
Fold the finished cover along the spine and slide the passport into one pocket. It should seat without force, and the pocket edge should cover the book’s cover for about 2½ inches. Close the cover and check three things:
- The book slides in and out without force, which tells you the pockets are not too tight.
- The cover closes flat, which tells you the center strip is wide enough.
- The stitching holds when you pull the book against a pocket edge.
A tight pocket is a lesson for the next cover, because trimming a stitched pocket makes a mess of the seam. Hold your own book against the pattern before you cut, and write down the real measurement if it differs from 4.92 by 3.46 inches. A ruler on the book in your hand beats a standard on a screen.
Marcellino NY Pattern Pack No. 4
Passport Cover: Printable PDF Pattern
⬇ DOWNLOAD THE PATTERN PACK (PDF)6 pages · US Letter or A4, print at 100% · materials list, true-size pattern, assembly steps, print check
Sources
- US Department of State, passport book and card comparison (book size 5 by 3½ in): https://Travel.State.Gov/content/dam/passports/forms-fees/Passport%20Book%20vs%20Card%20_ENG_2022.pdf
- Wikipedia, ISO/IEC 7810 (ID-3 passport booklet 125 x 88 mm; used because no better source was reachable): https://en.wikipedia.org/wiki/ISO/IEC_7810
- Berry Appleman & Leiden, State Department implementing one passport book size (April 20, 2026): https://www.bal.com/?p=9004111222160011
- Tandy Leather, leather weight and thickness chart: https://tandyleather.ca/blogs/tandy-blog/leather-weight-thickness-chart
- Lee Valley, leather-stitching chisels and awl sets: https://www.leevalley.com/en-ca/shop/tools/hand-tools/chisels/specialty/76712-leather-stitching-chisels-and-awl-sets
- Sailrite, how to finish leather edges: https://www.sailrite.com/how-to-finish-leather-edges
- Art of Manliness, how to sew leather: https://www.artofmanliness.com/skills/craftsmanship/how-to-sew-leather-and-other-tough-materials/
- Weaver Leather Supply, how to hand sew leather: https://www.weaverleathersupply.com/pages/how-to-hand-sew-leather
- Video: Marcellino NY Briefcase Maker on YouTube, https://www.youtube.com/watch?v=TfhUpTnerOg
You might also like
- Sanding Edges Before You Burnish
- Making a Pattern From Cardboard
- Harness Needles and Sharp Needles
- A Leather Eyeglass Case


