
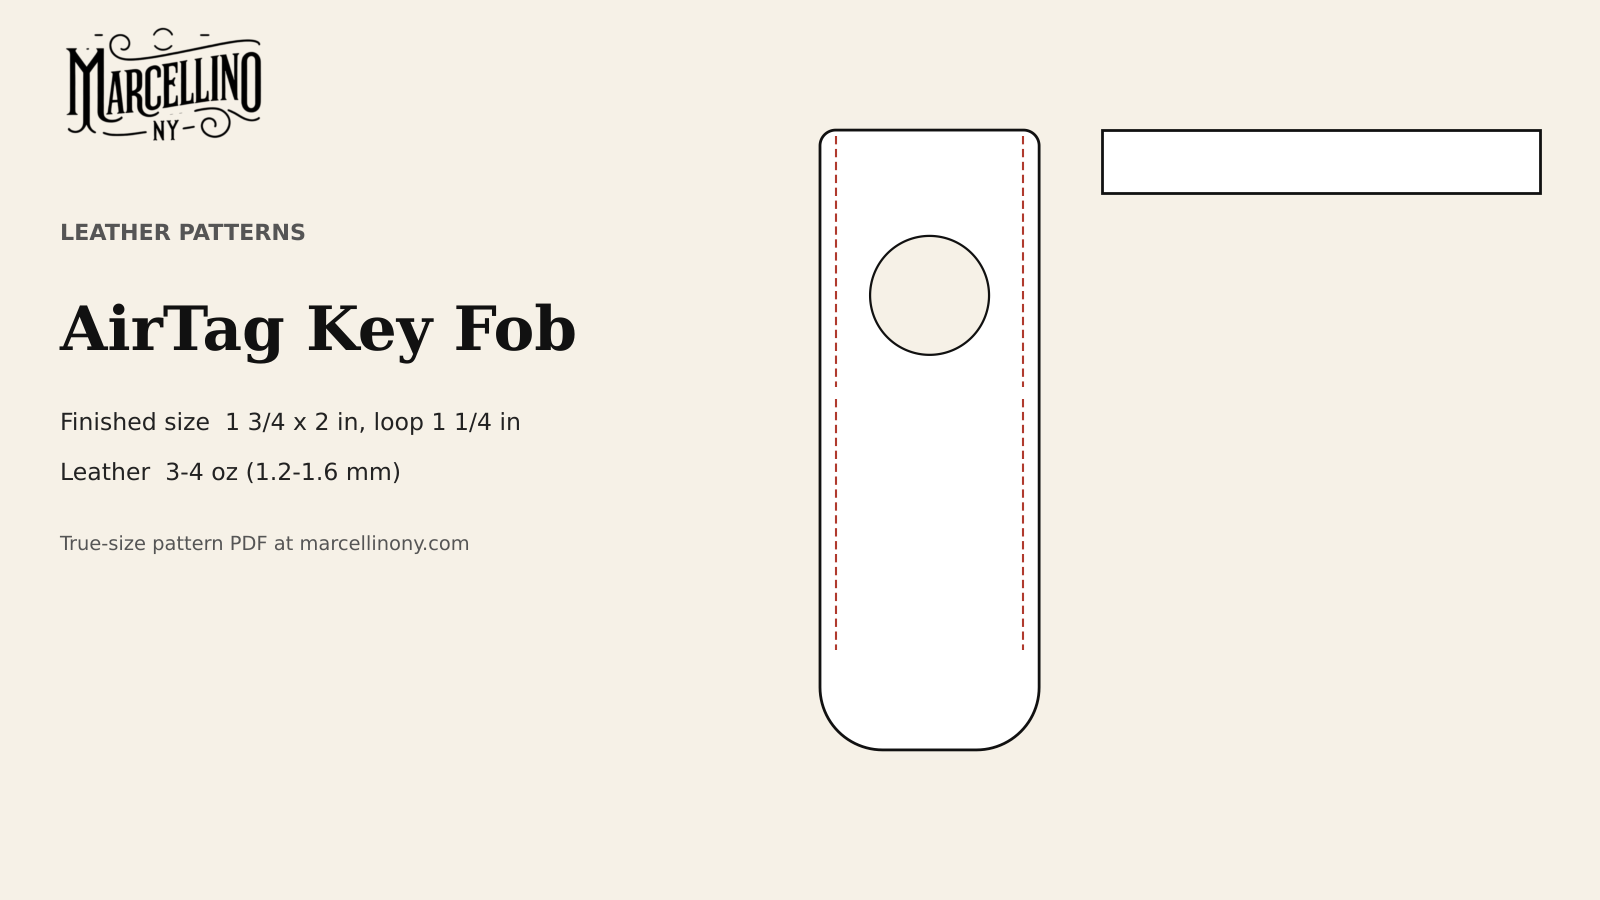
An AirTag is a coin of plastic and a battery, and what a leather holder has to do is simple: keep the tag from falling out, and take the pull of a key ring without tearing. Most of the design work goes into the first of those jobs.
Video: Splitting / Skiving Leather Strip With An Old School Hand Crank Weaver Machine, from Marcellino NY Briefcase Maker on YouTube. Shown for inspiration and technique only: it is not the item in this pattern pack.
Marcellino NY Pattern Pack No. 7
AirTag Key Fob: Printable PDF Pattern
⬇ DOWNLOAD THE PATTERN PACK (PDF)6 pages · US Letter or A4, print at 100% · materials list, true-size pattern, assembly steps, print check
The pattern is a Marcellino NY design that prints at true size in the Marcellino NY Pattern Pack No. 7: AirTag Key Fob, one PDF with a materials list, true-size pattern pages, an assembly diagram, step-by-step instructions and a print-accuracy check. It cuts the pouch from a single folded piece and adds a small loop strap for the ring. The video above shows a hand-cranked splitting machine reducing a strip of leather. It is inspiration only for thinning the flap edge, and it is not the fob in this pattern.
The fob sits alongside A Leather Key Fob in an Hour, a plainer build with no pouch. This version is for a tag that has to be seen, kept and replaced.
What the pouch has to fit
Apple lists the AirTag at 31.9 mm in diameter, 8.0 mm high and 11 g, with a user-replaceable CR2032 coin cell. In inches that is 1.256 across and 0.315 thick.
The pouch is 1¾ inches wide. With stitching ⅛ inch inside each side edge, the inside width is 1½ inches, which leaves about ¼ inch around the tag. The extra room is deliberate. Leather is stiff at this size, and a pocket cut to the exact diameter will not take the tag without stretching.
The front panel has a round window 0.95 inch across. That is narrower than the tag, so the tag cannot be pushed out through the front. The back is solid. Seen through the window, the tag’s face is visible for the owner and the rim is hidden. Changing the battery takes the snap undone and the tag out of the top.
One piece, folded
The body is a single strip, 1¾ by 4 15/16 inches, with four zones from top to bottom:
- Front panel, 2.1 inches, with the window and the snap stud
- Fold line, the bottom of the pouch
- Back panel, 2.1 inches, solid
- Flap, ¾ inch, with a rounded tip and the snap cap
Fold the strip at the fold line with the grain outside. The back panel lies behind the front and the flap continues up past the front panel’s top edge. The pouch is open at the top, and the flap folds forward to close it.
A folded pouch has one advantage over two stitched pieces. The bottom is a fold, not a seam, so there is no stitching at the point where the tag sits and presses. The weight of the tag rests on the bend of the leather.
Sizes are listed in the PDF: the window is centred 0.78 inch above the fold line, the stud hole is ¼ inch below the front’s top edge, and the cap hole is ½ inch from the flap tip. These positions are a Marcellino NY design. Test them on a paper copy with a real tag before cutting leather.

The leather and the hardware
Three to four ounces of vegetable-tanned leather, 1.2 to 1.6 mm by Tandy’s chart, is the target. Thinner leather gives under the tag; thicker leather is hard to fold at a ¾ inch flap and hard to stitch through two layers plus a loop.
The hardware list is short: one snap set, either Line 20 or Line 24 with the cap, socket, stud and post, and a split ring of about an inch. A 1 inch disc of 2 oz leather glued behind the stud keeps the post from pressing on the tag.
Thread is 0.8 mm waxed polyester or linen. Twenty inches covers both side seams with room for locking stitches.
Making it
Cut the body and loop strap from the templates. Cut the window with a round punch close to 0.95 inch if one is available. Without one, draw the circle and cut it with a sharp knife against a template. Cut slowly. A ragged window edge is what the owner sees every day.
Punch the snap holes next, before any folding. The stud hole is on the front panel and the cap hole is on the flap. Set the cap and socket on the flap, then the stud on the front panel with the disc behind it.
Bevel and burnish the front panel’s top edge, the flap and the window edge. The top edge cannot be reached once the fob is folded.
Fold the strip, grain out, and glue the margins. Fold the loop strap in half and insert its ends ½ inch into the left seam, about ½ inch below the opening. The loop sits outside the left edge.
Mark the stitch line ⅛ inch from each side. Punch with a 3 mm chisel through both layers and the loop ends, then saddle stitch each side from the fold up to the opening. Saddle Stitch: Hand Sewing Leather covers the stitch. At the loop, go back four holes when locking the thread. That seam carries every pull on the ring.
Finally sand and burnish the side edges. Round the flap tip with the radius on the template; Rounding Corners Cleanly has the method.

Closing the flap
Slide the tag in from the top with its face against the window, fold the flap forward over the opening and press the cap onto the stud. The flap covers the top ¾ inch of the front. It stops before the window with about 0.1 inch to spare, so the tag stays visible.
Snaps need seating. Setting Rivets and Chicago Screws Cleanly covers the same mallet-and-setter technique. Practise on scrap first. A crushed post cannot be undone.
Popsewing’s AirTag keychain kit uses the same ideas in a different layout: hand-stitched sides, a keyring fastened to the leather, and a flap that holds the tag in. Different cuts, same logic.
Thinning the fold and the flap edge
Three to four ounces of leather folds without help, but a ¾ inch flap with a snap cap, laid over a front panel with a stud, stacks up fast. Two layers of leather and the snap hardware sit on top of each other at the closing point. Thin the underside of the flap’s tip a little and the closure sits flatter.
Skiving does that. A skiving knife or a splitting machine removes leather from the flesh side so the edge tapers. The machine in the video above does the same job on a long strip. On a flap this small, a sharp knife held almost flat and a steady hand is enough. Take off a little at a time and stop at the stitch line; skive too far and the cap hole loses its grip.
The fold line takes the same care in reverse. Leave it full thickness. The fold is the bottom of the pouch and it carries the weight of the tag, so thinning it makes the weakest point weaker. If the fold cracks, the leather was dry or the grain was bent too tightly. Condition the leather lightly, bend it slowly over a rounded edge, and keep the radius of the bend as wide as the pouch allows.
Fit check with a real tag
Make the paper test the way the leather will be built. Cut the body from stiff paper, fold it at the fold line, tape the sides and slide the tag in from the top. Four things need to be right.
First, the tag sits at the bottom of the pouch with its face against the window and its rim hidden behind the front. Second, the window is smaller than the tag by about 0.3 inch all round, so it cannot slip out. Third, the flap closes over the opening with the cap hole over the stud hole. Fourth, the loop sits clear of the flap.
If the tag rattles, the pouch is too wide. Take the width down in 1/16 inch steps. If the paper pouch bows at the sides when the tag goes in, the pouch is too narrow, and leather will bow in the same way and wear at the stitching.

Mistakes that ruin the fob
- Stitching the loop in at an angle, so the pull on the ring twists the seam.
- Setting the stud without a backing disc, so the post bears against the tag.
- Cutting the window larger than the tag. The tag falls out through the front the first time the fob is dropped.
- Gluing the whole interior instead of the margins. Glue on the tag side can make the pouch grip the tag.
- Skipping the edge finish on the flap. It is the part that is handled every time the tag is checked.
Leather darkens and softens with use. The pouch will loosen a little after a month in a pocket, which is the reason the window is cut smaller than the tag and the back is left solid.
What was not tested
No part of this pattern was test-cut in leather before publication. The tag dimensions come from Apple and the layout from the geometry of the fold. Check on a paper copy that the flap reaches the stud with the tag inside. If the pouch is too snug, widen the body by 1/16 inch each side rather than enlarging the window.
Marcellino NY Pattern Pack No. 7
AirTag Key Fob: Printable PDF Pattern
⬇ DOWNLOAD THE PATTERN PACK (PDF)6 pages · US Letter or A4, print at 100% · materials list, true-size pattern, assembly steps, print check
Sources
- Apple Support, AirTag technical specifications: https://support.apple.com/en-kz/111847
- Tandy Leather, leather weight and thickness chart: https://tandyleather.ca/blogs/tandy-blog/leather-weight-thickness-chart
- Popsewing, make your own leather AirTag keychain: https://popsewing.com/blogs/news/step-by-step-guide-how-to-make-your-own-leather-airtag-keychain
- Lee Valley, leather-stitching chisels and awl sets: https://www.leevalley.com/en-ca/shop/tools/hand-tools/chisels/specialty/76712-leather-stitching-chisels-and-awl-sets
- Video: Marcellino NY Briefcase Maker on YouTube, https://www.youtube.com/watch?v=KEpqoM9RZZg
You might also like
- A Leather Key Fob in an Hour
- Setting Rivets and Chicago Screws Cleanly
- The Saddle Stitch Explained: Hand-Sewing Leather Step by Step
- Rounding Corners Cleanly


